Your Cart is Empty
WATCH BAND INSTALLATION GUIDE
Supplies Needed:
- spring bar tool (recommended) or small flathead screwdriver (1.5 – 2.0mm)
- a non-abrasive cloth or towel
- masking tape/painters tape
General Tips & Set-up:
- Use a flat, open surface, such as a table to set up your workspace.
- Lay down the towel or cloth on the table to protect your watch from sliding around and to keep the supplies from rolling away.
- We recommend using masking tape or painter’s tape to cover your lug ends (minus the lug holes) to protect the lug ends from being scratched by tools.
- Always work from the case back (underside) of your watch. That way, if you accidentally slip with your tool and scratch the watch, it won’t be visible from the front.
- Note: If you’d prefer not to install the band yourself, we recommend consulting a local watchmaker or jeweler to properly install your band.
HOW TO REMOVE A STANDARD WATCH STRAP
Removing a Leather, Nylon, Canvas or Rubber Two-Piece Strap:
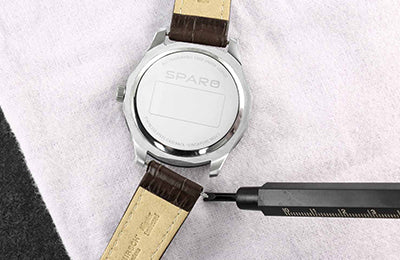
Lay your watch upside down on the towel and pick up your spring bar tool or screwdriver. We recommend covering the lungs (minus lug holes) with masking or painter’s tape to avoid potential scratching from the tools.
Insert forked end of spring bar tool in between the case lug and the strap to catch the shoulder (ridge) of the spring bar.
Depress the spring bar by applying pressure with the tool towards the strap and away from the watch case, pressing downward. When the spring bar is clear of the lug, that side of the strap will drop down and out of the watch case. Gently pull the other side of the strap out of the case.
Slide watch around and repeat Steps 2-3 to the other half of the watch strap. You’re all done! If the spring bars are in good condition after removal they can be re-used on the replacement band.
HOW TO INSTALL A STANDARD WATCH STRAP
Installing a Leather, Nylon, Canvas or Rubber Two-Piece Strap:
Slide your spring bars into the hole on the ends of both watch strap pieces. Push them all the way in so they are centered inside the strap.
Lay watch face down on cloth. Install the buckle side strap on the top of the watch (at 12 o’clock). Insert one end of the spring bar into the hole on the watch lug. Pick up spring bar tool in other hand.
Depress the other end of the spring bar by applying pressure with the tool towards the strap and away from the watch case. Slide spring bar inside the hole in the watch lug. Make sure both ends of the spring bar securely snap into their holes.
Repeat Steps 2-3 to install the point side strap, which goes on the bottom of the watch (at 6 o’clock). You’re all done!
HOW TO REMOVE A STANDARD METAL WATCH BAND
Removing a Metal Bracelet or Expansion Watch Band:
Optional Tip: Opening the bracelet to lay flat will make the process easier. To do this, remove the spring bar from the clasp. Use your spring bar tool (the push pin end) to depress the spring bar and release it from the clasp.
We recommend covering the lugs (minus lug holes) with masking or painter’s tape to avoid potential scratching from the tools. Lay watch face down on the towel. Insert the forked end of the spring bar tool into the small gap where the spring bar is visible to catch the shoulder (ridge) of the spring bar.
Depress the spring bar by applying pressure with the tool towards the watch band and away from the watch case. When the spring bar is clear of the lug, that side of the band will drop down and out of the watch case. You may need to depress both sides of the spring bar at the same time to gently wiggle the band out. Metal bands tend to fit tighter in the lugs.
Slide watch around and repeat Steps 2-3 to the other side of the watch band. You’re all done! If the spring bars are in good condition after removal they can be re-used on the replacement band.
HOW TO INSTALL A STANDARD METAL WATCH BAND
Installing a Metal Bracelet or Expansion Watch Band:
Opening the bracelet to lay flat will make the process easier. To do this, remove the spring bar from the clasp by using your spring bar tool (the push pin end), or push-pin tool, to depress the small spring bar and release it from the clasp. Slide your larger spring bars (the ones meant for the band) into the holes on both band ends. Push them all the way in so they are centered inside the band.
We recommend covering the watch lugs (minus lug holes) with masking or painter’s tape to avoid potential scratching from the tools. With your watch laying face down on the towel, insert one band end into a lug hole. Check to make sure that the finished side of the band is facing the same side as the watch face (downward in this case).
Depress the spring bar by applying pressure with the forked end of the tool towards the band and away from the watch case. Gently press downward and move the band end around so that the spring bar slides into lug. You should feel it click into place in the lug hole. Slide watch around and repeat Steps 2-3 with the other band end. Steps 3 and 4 can be tricky and may take a few tries for a beginner.
To attach the clasp back together, set your watch on its side as shown above (we used a watch wood-working block). It's also easiest if you open up the clasp all the way, as shown above. Insert the small spring bar back into the clasp if it came out, and use your push-pin tool or the pointed side of your spring bar tool to depress one side of the spring bar so that it slips inside the clasp and grabs one of the holes. The different holes on the clasp allow you to make minor size adjustments. Once done, you’ve successfully installed your new metal band!


